Fall Wreath

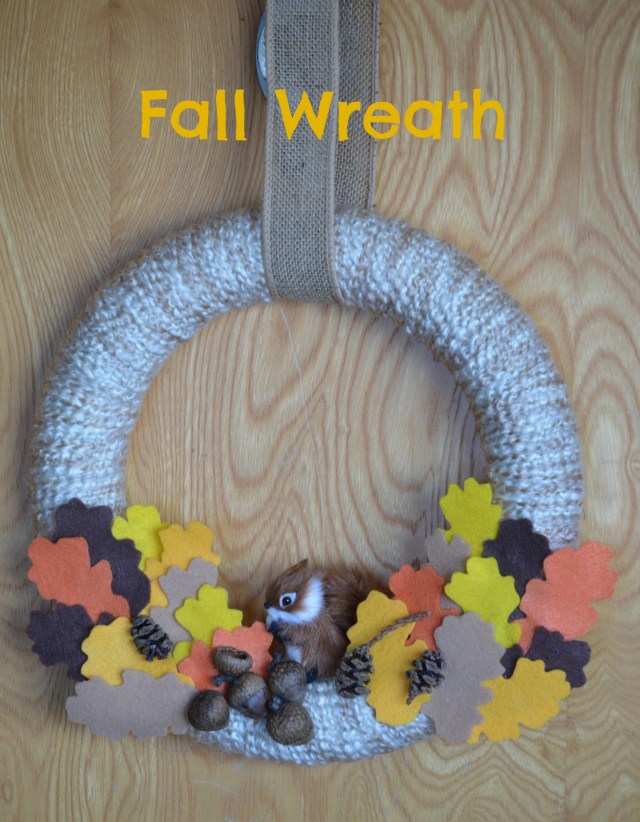
Happy (day after) Thanksgiving!  I was seriously behind on my Thanksgiving crafts this year.  I meant to make a few things in the beginning of November, but didn’t have time to head out to Michael’s or JoAnne Fabric to get supplies.  But, I was finally able to find some time last weekend to make the trip.  In addition to getting some fall craft supplies, I was also able to stock up on some holiday supplies, which is always good.  Although we are nosediving right into the holiday season,  I still wanted to post this super cute fall wreath I made yesterday on Thanksgiving.  There are still a few days left in “fall” (aka November!).
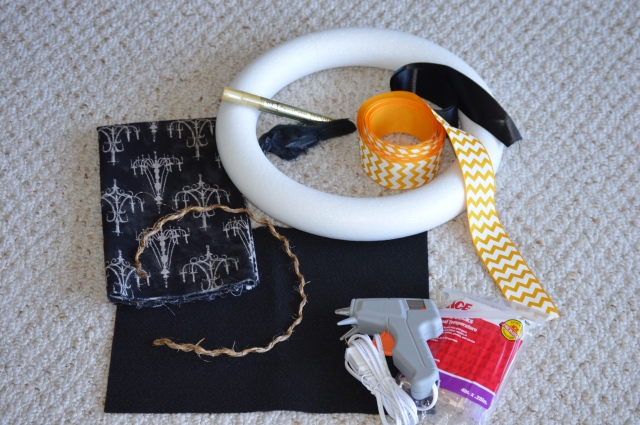
dsc_0264

Materials:

dsc_0247

Styrofoam wreath 12″ diameter
Yarn (you want the color to look like a snowy branch)
Felt squares (fall foliage colors)
Squirrel ornament
Mini pinecones and acorns
64″ Burlap ribbon
Pencil
Hot glue gun & extra glue sticks

Directions:

1. Freehand or using a printed template, trace and cut out multiple leaves out of your fall foliage color felts.  I ended up cutting out 4 of each color (20 total).

dsc_0248

2. Using the hot glue gun, glue the yarn onto the styrofoam wreath.  You’ll need to keep the yarn together, so I just looped the entire bundle through the wreath each time.  I would also put a small line of hot glue on the top and underside of the wreath, and wrap the yarn around the wreath, attaching with the glue.  This is a tedious process, but necessary so the yarn doesn’t slip around.  When I arrived back at the beginning, I did another quick loop with the yarn around the styrofoam to make sure I didn’t have any of the styrofoam peaking through.  The second go does not have to be as tight as the first.

3. Once your yarn is set, arrange your leaves how you’d like to them to be clustered.

4. Flip the cluster of leaves over (kind of like flipping a pancake) and glue the cluster together.  You can do this by seeing which parts of the leaf overlap another and just glue that little part.  Your cluster should basically be one entity when you pick it up.

5. Glue your cluster of leaves onto the wreath, leaving space for your squirrel ornament.

dsc_0256

6. Glue on your squirrel ornament, pinecones, and acorn.

dsc_0257

7. Take your burlap ribbon and loop it into the wreath.  Tie a bow at the top and hang!

dsc_0262

Halloween Crow Wreath

My favorite season, Fall, is here and Halloween is fast approaching.  I’m not afraid to admit that I essentially love everything “basic” about this season.  Although I do find pumpkin spice lattes a bit too sweet, I love decorating, going to pumpkin patches, and the impending chilly weather (but in SF it’s more like the weather finally matches the season).  In the past I had put some maize corn on our door as a decoration, but last year I saw some really cute fall wreaths on Pinterest and decided to make my own.  Here’s how you can make this really cute wreath yourself!

final-wreath-for-blog

Materials:

materialsStyrofoam “donut circle” – 12in diameter
1 yard black ribbon
2 yards chevron orange and white ribbon
Toy crow
Gold felt pen
1 ft twine
Hot glue gun & extra glue
Black felt square
Small piece of fabric of your pattern choice – I purchased 1 yard at the store because I knew I’d use it again, but really you only need enough to make your crow a large enough hat.

Instructions:

1. Start with the chevron orange ribbon and styrofoam. Using the hot glue gun, glue the beginning end to what you’ll deem the back of the wreath. Then, slowly wrap the ribbon around the styrofoam.  Every two wrap-arounds, use the hot glue gun to glue down the ribbon.  In the image below, I would put a small line of glue where the ribbon is hitting the styrofoam.  Do this until you have again reached your starting point (it’s OK if it overlaps a little), and make sure the end part of the ribbon is glued on the back.

ribbon

2. Take the twine and measure the length you’ll have the “boo” sign reach one side of the styrofoam to the other and cut.  You’ll want a bit of slack so it looks like the sign is hanging.  Do NOT glue on styrofoam yet.

twine-1

3. Cut out three small triangles from the black felt and write out “BOO” with each letter on a separate triangle.

boo-cutouts

4. Using the hot glue gun, glue each triangle onto the twine.  Once the glue has dried, glue the twine onto styrofoam at the points where you previously measured.

boo-glued

5. Time to make a cute hat for your crow!  Take a piece of fabric and roll it into a cylinder hat shape that is an appropriate size for the crow.  Use the hot glue gun to glue it together.  If you’d like, you can take a piece of twine and make a bottom liner for the hat and glue on with the hot glue gun.  Once you’ve created your hat, glue onto the crow.  I found the easiest way to do this was to put some glue on the crow’s head approximately how wide the hat is and press down lightly.

hat

6. Hot glue gun your crow onto the wreath wherever you’d like him to sit.  I also took some twine and feathered the edges to make it look as though he was sitting on a broom.  Hot glue gun that near his feet!

crow-close-up

7.  Lastly, figure out where you’d like to hang the wreath.  Take your black ribbon and loop in around the top of your wreath and tie the top into a nice bow.  You can shorten your ribbon if you’d like the wreath to hang higher. boo-close-up

8. Hang your wreath and enjoy!  Happy Halloween!

final-wreath

Fall Chickpea Squash Chili

Fall recipe time!  I would definitely consider this chili a fall recipe since it uses butternut squash (for some reason squash equates to fall and winter in my mind).  I waited to post this until fall for this reason because I actually made it this summer (breaking all the rules!).  We had leftover butternut squash from this mac & cheese recipe I made a few days earlier.  I originally followed the “seasonality rules” with this two falls ago when I was living in Boston and wanted to make a fall dish (which was a surprise to myself since I wasn’t big on complicated recipes).  Similar with baking, I was never super into cooking elaborate dishes, but for some reason I saw the squash at a farmer’s market and found this particular recipe for Chickpea Chili calling to me.  It turns out that I really enjoyed cooking it and suddenly cooking became a lot less scary and a lot more interesting.  The original recipe can be found from Cooking Light and requires a crock pot and around 9 hours of simmering, but it can definitely be made in a medium-large pot with 3-5 hours of simmering.  It’s a great dish to make on a Sunday afternoon when you don’t have any plans and it fills the entire house up with a lovely aroma of spices.  It also keeps well and tastes excellent heated up!  And the great part is that you WILL have leftovers from this recipe!

Chickpea & Squash Chili - cooking edit


Ingredients:
1 cup canned chickpeas
2 tbs olive oil (or cooking spray if you want to keep it very healthy)
1 1/2 cups chopped onion
5 garlic cloves, minced
1 tbs tomato paste
1 1/2 tsp ground cumin
1 tsp salt
1/2 tsp crushed red pepper flakes
1/2 tsp ground cinnamon
1/4 tsp ground tumeric
2 1/2 cups fat-free lower-sodium chicken broth
1/2 cup water
1/2 cup golden raisins
1 (28-ounce) can crushed tomatoes (undrained)
4 cups chopped butternut squash
1 cup frozen peas, thawed
6 cups hot couscous
8 lime wedges
1/4 cup chopped fresh cilantro

Directions:

  1. Heat a large skillet over medium-high heat. Add 1 tablespoon oil to pan (or cooking spray). Add onion; sauté 4 minutes, stirring occasionally. Add garlic; sauté 1 minute, stirring constantly. Stir in tomato paste and next 5 ingredients (through turmeric); sauté 30 seconds, stirring constantly.
  2. Add onion mixture to slow cooker.  If you don’t have a slow cooker, you can use a large pot (which is what I used).   Add broth and next 4 ingredients (through tomatoes); cover and cook on HIGH 8 hours.  Or, if you are using a pot, 4-5 hours.
  3. Heat a large skillet over medium-high heat. Add remaining 1 tablespoon oil; swirl to coat. Add squash and sauté 5 minutes. Add squash to slow cooker/pot. Cover and cook on HIGH 1 hour, or low-medium heat.  Stir in peas. Sprinkle with cilantro. Serve over couscous with lime wedges!

Chickpea & Squash Chili - plate 2!Chickpea & Squash Chili - plate!