A Plastic Free You & Me: Sustainable Kitchen & On the Go

Welcome to the last installment of my plastic-free, sustainable living series! This post’s focus is on kitchen and “on the go” items. We naturally consume a lot of plastic when we’re on the move and in the kitchen because it’s convenient. It doesn’t have to be that way, though! There are plenty of options out there that will help you consume less and still maintain a level of convenience. 

On the Go

Reusable water bottles and reusable grocery bags are the easy ones here. I’m confident to say that we all probably have a bunch of these lying around. I usually keep some reusable grocery bags in the trunk of my car so if I forget to bring them with me, they’re right there. I also keep a water bottle at my desk to bring if I go out to lunch so I don’t need to use a cup. 

At some point in your life, you’ve probably received a reusable water bottle with a random company logo on it. I’ve taken to getting some cool stickers (like when I visit a national park!) and using them to cover up the logo.

Taking reusable grocery bags a step further, I was gifted a set of reusable produce bags. These have been really useful at the grocery store when purchasing small piece produce – think brussels sprouts or green beans. In general though, I typically use a bag for produce very rarely. In my opinion, you don’t really need it for larger items like tomatoes, potatoes, even if you’re getting a few. I don’t even use one if I’m only getting like one jalapeno. But if you’re buying small things like brussels sprouts, you do need a bag. These are really useful and I have them live in my grocery bags so if I don’t remember to actively bring it, chances are there’s one in one of the bags I’ve brought. I also keep a few in our cabinet to use for storing produce at home like potatoes or a half head of cauliflower.

I also carry a set of bamboo reusable utensils I bought off Etsy to keep in my backpack that I bring to and from work. It’s been really great to use when I need a utensil and the only ones available are plastic. It came with a handy holder, so I usually just wipe whatever utensil I used off with a napkin and wash it when I get back to my office. It’s also been great for using at the airport and traveling! 

Kitchen

I think in general I typically do a good job keeping my kitchen plastic free. I rarely use cling wrap, and we have a variety of different tupperwares that we use to store food. The things I find myself using most in the kitchen are aluminum foil, plastic bags, and paper towels/napkins. 

I reuse plastic bags as much as possible and invest in compostable ones for items I know I won’t want to wash (like meat). Depending on your location, you can likely find compostable sandwiches and snack bags at your grocery store. They’re a bit more expensive, but my suggestion is to only use them for things where you know you’re going to throw the bag away. I’d really like to try Stasher bags eventually, so stay tuned on those. 

Food Wraps

Etee is a great site that has a bunch of plastic free items for your home. I’ve purchased their vegan food wraps twice and they work really great. With moderate use, my first set lasted for over a year. They work well for covering bowls that don’t have a top, covers for the ends of produce (like half of a cucumber), and transport for things like hard boiled eggs (vs using a baggie). The best part is that when they’ve reached the end of their life, they’re compostable!

A tip: Use a milder dish detergent and cold water to wash and they’ll last longer. 

Reusable Napkins

I was gifted these and I really love them. They’re definitely worth the investment and we use them fairly often. I usually use one for a day or two and then will wash it when I’m ready to do a load of towels. In the in-between time, we usually use the napkins we’ve received from takeout if we have them.  

Reusable Paper Towels

There are a lot of options out there for reusable paper towels! One option is Swedish dish towels. I was also gifted these (yes, same time as the reusable napkins!). They work surprisingly well, but do get a little gross-looking after a while (so I’ve spared you the picture). I haven’t quite figured out what their lifespan is yet, but despite their looks, they seem to still be working well after around nine months.

I was also gifted (can you sense a pattern here?! No complaints though – I love it!) a complete roll of reusable bamboo paper towels. In my first few uses, these have worked very well and wash easily. They feel like regular paper towels, but much stronger!

All of these reusable napkins and towels have come in handy during COVID since there have been multiple bouts of paper towel shortages. I’ve been able to go a while without needing to buy paper towels, saving money and the environment! I have a bag hanging in my laundry room that I throw reusable items into and when it’s fairly full, I’ll do a load to wash them. 

In Conclusion…

I’m only one person, but I believe strongly that if we all make small changes in our behavior it will make a difference. I hope these posts were helpful and provided you with some ideas to invest in plastic and waste-free options for your own home! I have some other products I’d like to try – like eco-friendly hair ties and the Stasher bags. It’s just a matter of making the investment and also depleting my current stock of what I have on hand before buying the new, eco-friendly version! Thanks for reading and stay tuned for more!

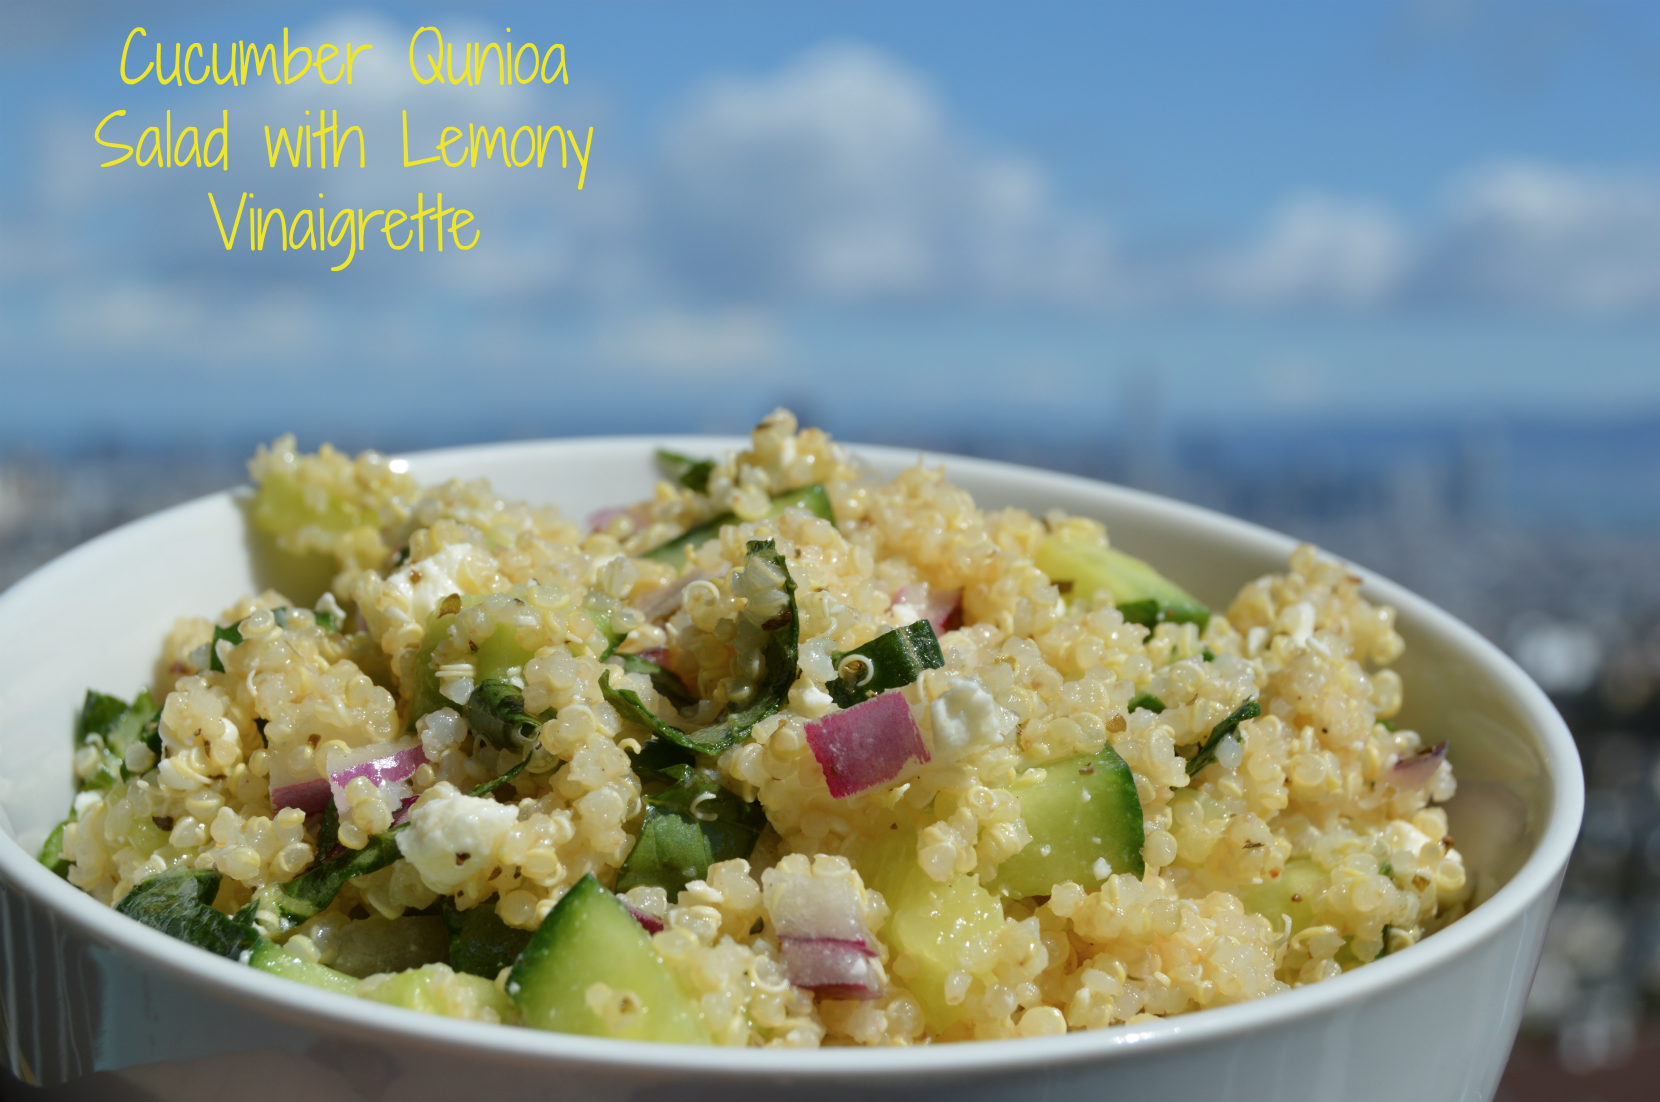
Cucumber Quinoa Salad with Lemony Vinaigrette

I’m not quite sure how I came across this recipe.  I want to say it’s because we had a cucumber in our produce box, but with the service we use (Imperfect Produce – link to site and also I have written about them in the past) we get to pick what’s in there.  I don’t really make a lot of stuff with cucumber, so I’m hesitant to think I’d pick a cucumber.  I think it could have also been that we had some old quinoa lying around and I don’t cook very often with quinoa so I needed some recipe inspiration.  That’s where this Cucumber Quinoa Salad from Gimme Some Oven comes in!

This salad is super easy to make and also very filling and tasty.  It makes a great lunch, side dish, or even dinner on a hot summer day.  I follow the instructions very closely to the original, but I have noticed that it can take about 50% more quinoa and still be tasty.  So if you want to spread out the salad a bit with more quinoa, that works great.  I sometimes use 3 cups cooked quinoa instead of the recommended 2 cups.

Screen Shot 2018-03-25 at 1.33.37 PM

DSC_0984

ps qunioa salad1

Salad Ingredients:
1 cucumber, diced
2 cups cooked and chilled quinoa
1/2 cup red onion, diced
1/2 cup crumbled feta cheese
1/3 roughly chopped basil leaves
1 batch lemony vinaigrette (see below)

Lemony Vinaigrette Ingredients:
1/4 cup extra virgin oil
2-3 tablespoons apple cider vinegar
1 tablespoon fresh lemon juice
1 teaspoon dried Italian seasoning blend
Pinch of salt and pepper

Instructions:
Combine all salad ingredients into a large bowl and mix.  Combine all Lemony Vinaigrette ingredients into a smaller bowl and whisk together.  Pour Lemony Vinaigrette mixture onto salad and mix one last time.

DSC_0982

My Skincare Routine and Cocokind Review!

For the record, this post is my own view and I did not receive any compensation for this post.  Other than my two online orders and my Instagram likes of their posts, Cocokind doesn’t know I exist :).

For a few years now I have been making a conscious effort to be more aware of the beauty products I am purchasing.  I am strongly against animal testing in the beauty industry and overall have been making an effort to reduce the amount of chemicals I bring into my home.  I’ve been working hard to find beauty products that are not only completely natural, but also animal testing free and vegan.

For a while I was using Origins products, but then I was disappointed to learn that while they don’t do animal testing in general, they sell in China, which still requires animal testing.  Also, their products are not as natural as I’d like.

While I was finishing up my Origins stock, I decided to search for some new beauty products to try.  I settled on two that I liked: Cocokind and 100% Pure.  100% Pure has a entire line of beauty products ranging from makeup to face washes to body wash, while Cocokind mostly has face care products.  I decided to go with Cocokind for skincare because they are a bit more affordable, and I appreciate their commitment to maintaining affordable prices.  I was attracted to their organic, simple ingredients, and I admire the fact that that their founder is focused on empowering women.  The brand is also local to me here in San Francisco!  (For the record – although it’s more expensive than Cocokind, 100% Pure is great and also empowers women.  I actually get my makeup products there, so more on them in another post!)

Cocokind products are oil based, which believe it or not, is not as bad for your skin as you were lead to believe as a teen.  You can buy their products online or in certain retail stores, like Whole Foods (although it depends on your area, so check Cocokind’s website before you go).  Most of their products are also vegan!

I was really excited to try out Cocokind, so I headed to my local Whole Foods and picked up close to the full line of products (some I ordered online).  Here’s what I bought and how I used them:

Organic Facial Cleansing Oil – was using to cleanse in the morning and at night
Organic Sea Moss Exfoliator – every other morning as an exfoliator
Organic Rosewater Facial Toner – after cleansing, morning and night
Organic Facial Repair Serum – after cleansing and toning, morning
Organic Matcha Face Moisturizer – after cleansing and toning, night
Organic Chlorophyll Mask – when needed
Cocokind Collective – MyMatcha moisture stick, Macabeet tinted moisture stick, Turmeric spot treatment – when needed

DSC_0400

My Cocokind haul!

OK, now onto what you really what to know – how did it go?

For some reason my face had decided that it didn’t like my previous routine anymore and I was breaking out like crazy.  So, when I tried Cocokind it was in pretty bad shape.  It took about two months for my face to become accustomed to Cocokind’s products.  It didn’t get any worse, but it wasn’t getting any better.  After about a month and half, Cocokind introduced their Raspberry Vinegar Toner, which seriously helped my skin.  I saw a decline in acne after using the Raspberry toner in the morning and at night in lieu of the Rosewater Toner.  At night I also add some watered down apple cider vinegar to my cotton pad for some extra umpfh.  I use the Raspberry Vinegar Toner every day now, unless I’m going somewhere fancy and don’t want the chance of my face smelling like vinegar.  It’s definitely not a strong scent, especially when you put moisturizer and makeup on top of it, but there’s still something about knowing you might smell like vinegar that might ruin a fancy event or date.  So in those cases, I just use the Rosewater toner.

However, even after the improvements I saw with the vinegar toner, my face wasn’t really where I wanted to it be.  I was still breaking out some and noticed an increase in large-ish blackheads.  I decided my face needed a little something stronger, so I searched for a natural facewash with benzoyl peroxide or salicylic acid.  I found Alba Botanica Natural Acnedote Deep Pore Wash and this has worked fantastic.  Alba Botanica is also fairly natural and against animal testing, so I was OK with using it.  I realized through this process that sometimes you need some reinforcements.  Instead of Cocokind’s Facial Cleansing Oil, I now use the Alba Botanica cleanser every other morning (the others I use Cocokind’s Sea Moss Exfoliator) and at night and my face has gotten significantly better.


Another change I made to my skincare routine was how I sleep. I realized my hair was probably a source of breakouts since it usually has some kind of product in it.  Now I wear a satin bonnet when I sleep and I’ve also noticed a significant improvement in my skin.  They are super cheap and you can get them on Amazon.  Also, change your pillowcase often!

While my face was telling me I needed a stronger cleanser, I really love what Cocokind’s other products have done for me.  My face looks brighter and I know that my skin is absorbing nutrients and not chemicals.  After using the Organic Chlorophyll Mask, my skin just glows.  The Cocokind Collective sticks are also great for skincare on the go.  I have a reminder on my phone to use the MyMatcha moisture stick under my eyes every afternoon around 2pm, and I use the Macabeet tinted moisture stick as a natural blush and lip balm.  The Turmeric spot treatment is also great for those breakouts that still sometimes emerge because, well, I’m not perfect!

Overall, I’d highly recommend Cocokind’s products.  I love how they make my skin feel and how they are good for the environment.  I also love everything the company stands for and their founder’s (Priscilla Tsai) commitment to her products and making skinCARE.

Version 2

Lunch Option: Vegan Cabbage Curry

More vegan stuff!  So the reason for all the vegan recipes?  Well, a few months ago I decided to go full vegetarian (I will make exceptions on rare occasions, but for the most part I don’t eat meat anymore), and I also found out after I made that decision that I have high cholesterol!  Woo! Not enough that I need medication, but enough that some dietary changes were suggested.  I am not super strict about it since I already eat fairly healthy, but I cut out my morning yogurt and replaced it with oatmeal or a granola bar, and I try to cut out other items like dairy when I am cooking at home.  That way, I don’t have to be outrageously picky when I go out to eat.  Given the changes I’ve made, I think it will make a dent in the numbers.

I cooked this recipe for dinner one night and decided that it was better as a lunch meal.  It’s flavorful, but not enough that it left me satisfied me for dinner.  However, for lunch it is perfect because I’m not a big fan of heavy lunches.  It’s light enough to bring as a lunch and leaves me full, but not feeling sluggish.

I originally found this recipe on Healthier Steps, but modified it and added a few ingredients.  You should have about 4 days worth of lunches when you make this batch!

IMG_2323

Ingredients:

Jasmine rice – 4 servings

1/2 of a large cabbage, cut into strips

2 tbsp coconut oil

1/2 cup yellow onion, chopped

2 cloves garlic, minced

1 tsp ground coriander

1 tsp ground turmeric

1 tsp ground thyme or 2 fresh sprigs

1/2 tsp ground cumin

1 carrot, chopped

1 can of chick peas

1 cup of potatoes or sweet potatoes, chopped into small chunks

1-14oz can of light coconut milk

1/2 tsp sea salt or to taste


Instructions:

  1. Prep and cook rice.  You can have the rice cooking while you make the curry.
  2. Heat oil in a large skillet. Add onion and garlic and cook until onion is soft – about 5 minutes.
  3. Add coriander, turmeric, thyme, cumin, carrot, chick peas, potatoes, and cabbage and stir.
  4. Add coconut milk and bring to a boil.
  5. Cover saucepan and reduce to a simmer.  Cook for about 20 minutes.  Add some cornstarch if the sauce is not thick enough.

IMG_2324


Vegan Orange “Chicken” (Cauliflower)…or not vegan if you want!

Recently I’ve been trying to eat less meat, eggs, and dairy.  It’s very hard to completely cut out eggs and dairy (shoutout to the vegans out there), but the cutting out meat has been pretty easy, especially since I’ve been a vegetarian before.  My boyfriend isn’t a vegetarian, but I find it pretty easy to make us both the same dinner and just sub out my portion of meat for tofu or veggies.  I’m not picky about using the same pan or having them touch, so that makes things a lot easier.  Anyway, I came across this recipe and was very excited to make it.  By no means is it healthy, but I guess it’s slightly healthier than if you used chicken.  No matter how you slice it, you’re still deep frying something.

HOWEVER, the great part about this recipe is that if you don’t fry the cauliflower, the orange sauce is actually pretty healthy.  So, if you’re in the mood for something Chinese food-esque, I’d recommend frying the cauliflower.  If you’re looking for a quick vegan stir fry, just cook up some tofu (1/2 package) and add some frozen broccoli (170 oz for one).  If you want some legit orange chicken, just cook up some chicken (6 oz) and add some broccoli. Don’t use any cauliflower or batter. It’s that simple!

I found this recipe on Yummily Yours.  I adapted it slightly.

IMG_2322


Ingredients (serves one):

One serving of rice

6-8 florets of cauliflower

1/2 cup sliced into strips bell peppers of various colors

1/3 cup & 2 tbsp cornstarch

1/2 cup all purpose flower

1/4-1/2 cup water (to make batter)

Oil for frying

2 cloves of garlic, minced

1/4 teaspoon minced ginger

1 tablespoon orange zest

3/4 cup vegetable broth

1/2 cup freshly squeezed orange juice

2 tsp soy sauce

2 tbsp sugar

1 tsp Sriracha

Sprinkle of sesame seeds

Sprinkle of green onions


Instructions:

  1. Prepare rice – this can cook while you are making everything else.
  2. Heat oil for frying
  3. In another small frying pan, saute peppers for about 2-3 minutes.  Don’t overcook.  Set aside when done.
  4. Mix the corn starch, flour, and water to make a thick batter.  It should be thick enough to coat each cauliflower floret evenly.
  5. Coat each floret in batter and dip into the oil.
  6. Once the batter is crisp, remove the florets from the oil and place them on a paper towel to absorb extra oil.  You want them to remain crisp, so while they are cooking, you’ll want to make the sauce.
  7. Heat up the minced ginger and garlic for about a minute.  You can do this in the same pan you cooked the peppers in.
  8. Add in the orange zest.  Cook for another 30-60 seconds.
  9. Add broth, orange juice, sriracha, soy sauce, sugar and stir together.
  10. While that is heating up, mix together the 2 tablespoons of cornstarch in some cold water.
  11. Once the broth/orange juice/soy sauce/etc mixture comes to a boil, lower heat.
  12. Add in the corn starch slowly to mixture while stirring constantly.  The mixture should be very thick.
  13. Once it is thick, add in the peppers and cauliflower (or chicken/tofu + broccoli if you’re not using cauliflower).
  14. Mix well and heat everything in the pan for about 2 minutes.
  15. Put rice on a plate, and put your orange cauliflower on top. Sprinkle some sesame seeds and green onions on top.